If this is your first time working with Anna Apps, it may feel unfamiliar at first—but building your first Anna App is actually quite simple.
In this tutorial, we will not start with a large number of abstract concepts. Instead, we will begin with a truly functional small application. You will follow the tutorial step-by-step to complete project creation, interface development, Anna API calls, and local debugging, finally publishing the App to the Anna platform.
More importantly, developing on Anna does not mean you have to redo existing projects entirely. You can gradually integrate your existing Agents, scripts, tools, or workflows into Anna and directly utilize the platform capabilities provided by Anna, such as LLM, Runtime, and Storage. This transforms capabilities that could originally only run locally or required building your own environment into Apps that users can directly install and use.
We will build a simple AI Text Summary App. When a user enters a piece of text and clicks the button, the App sends the request to its bundled Python Tool (Anna Executa). The Executa then uses Anna’s reverse Sampling capability to ask the Anna host to call an LLM. Finally, the generated summary is returned to the App and displayed to the user.
This invocation chain completely demonstrates the collaboration between the frontend and backend tools in an Anna App:
App UI → Anna Runtime → Executa → Reverse Sampling → Anna LLM
Although this application is simple, it contains the core process of developing an Anna App:
- Creating an Anna App project
- Writing the application interface
- Connecting to Anna Runtime
- Calling Anna’s AI capabilities
- Configuring Manifest and application permissions
- Running and debugging locally
- Publishing to the Anna platform
You do not need to understand the full architecture of Anna App in advance, nor do you need to prepare your own model API Key. As long as you have basic knowledge of HTML, CSS, and JavaScript, and can use the terminal to run commands, you can complete this tutorial.
After completing this tutorial, what you get is not just a Demo, but also a reusable Anna App development process. Afterward, whether you want to add Agents, search, storage, image generation, or custom Executa tools, you can continue to expand on the basis of this project.
Next, we will spend a few minutes configuring the development environment and then formally create your first Anna App.
1.Set Local Agent as the Default Agent
This tutorial uses the Local Agent by default for local development and debugging.
Before starting, please confirm that your Local Agent has been registered in Anna and set it as the default Agent. This ensures that the local execution environment is prioritized during development and debugging, avoiding the need to switch between different Agents.
How to set it:
- Open Anna and click the menu button in the bottom left corner;
- Enter Agents;
- Find the Local Agent corresponding to your current computer under Local Agents;
- Click the
 Star button in the top right corner of the Agent card;
 - Select Set as Default.
Once successfully set, this Local Agent will become the current default Agent. If the Agent page already displays Remove Default, it means it is already the default Agent, and no further action is required.

2.Prepare the Development Environment
2.1 Install Development Tools
Before starting, you need to prepare Node.js, uv, and Anna CLI. These are the only three core tools required for Anna local development; Git and GitHub will also be used in the subsequent publishing chapters.
Required Installations:
- Node.js 22 or higher: To run Anna CLI and frontend development tools.
- uv: To run the Python environment and any Python Executa you might use.
- @anna-ai/cli: Provides commands such as
anna-app init,anna-app dev,anna-app validate, etc.
- macOS
If you have Homebrew installed, run the following in your terminal:
brew install fnm
echo 'eval "$(fnm env --use-on-cd --shell zsh)"' >> ~/.zshrc
source ~/.zshrc
fnm install 22
fnm default 22
curl -LsSf https://astral.sh/uv/install.sh | sh
npm install -g @anna-ai/cli
- Windows
Run the following in PowerShell:
winget install Schniz.fnm
fnm install 22
fnm default 22
powershell -ExecutionPolicy ByPass -c "irm https://astral.sh/uv/install.ps1 | iex"
npm install -g @anna-ai/cli
If you receive a “command not found” prompt after installation, please close and restart your terminal.
2.2 Check Development Environment
Once installation is complete, confirm that each tool is functioning correctly.
Run the following commands in sequence in your terminal:
node --version
npm --version
uv --version
anna-app --help
anna-app doctor
If Node.js displays v22.x or higher and anna-app doctor reports no errors, your environment is ready.

3.Log in to Anna CLI
3.1 Log in to your Anna Account
After completing the previous environment preparation, you are now able to start an Anna App locally.
If you wish to use the actual platform capabilities provided by Anna during local debugging—such as LLM, Agent Session, Storage, or image generation—you must first log in to your Anna account and authorize the @anna-ai/cli on your machine.
After logging into the Anna platform in your browser, first activate your developer account. You can do this by clicking More in the bottom left corner and entering the Developer Console. If you are unsure how to proceed, please refer to: Docs — Anna

Then, run the following in your local terminal:
anna-app login --host https://anna.partners
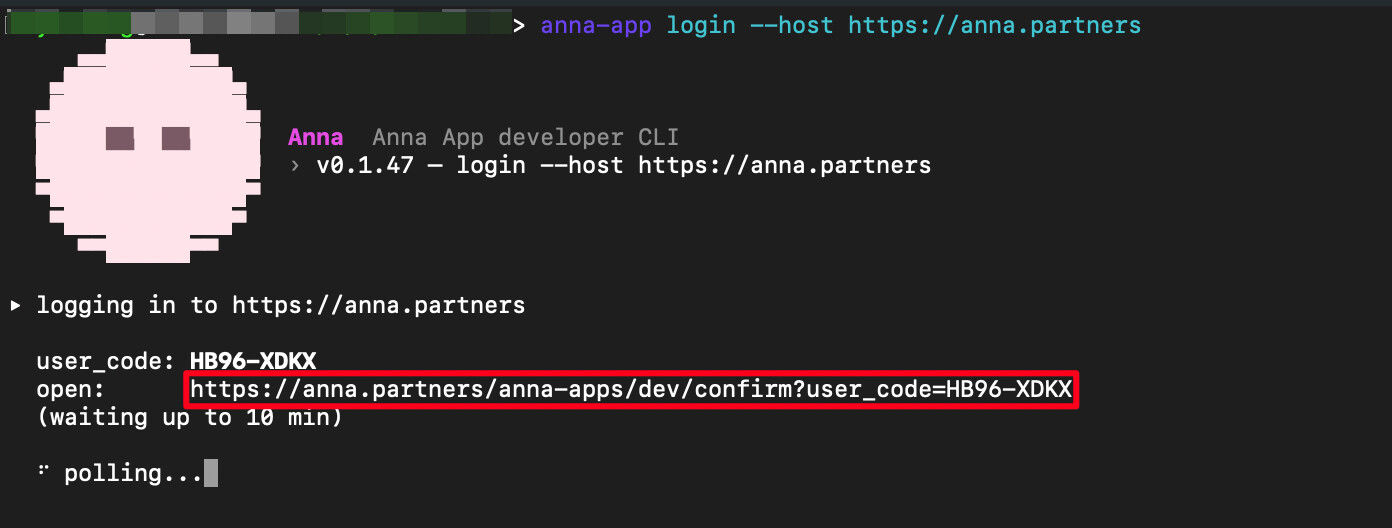
Once run, the CLI will generate an authorization URL and wait for your confirmation in the browser.
3.2 Complete Authorization in the Browser
Next, you need to complete the authorization in your browser. Open the authorization page indicated by the CLI (as shown in the red box in the image below). Click Approve to finish the authorization.

Upon successful authorization, the terminal will display something similar to:
✓ logged in. PAT saved to ~/.config/anna/credentials.json
expires in ~90d
The CLI will save the development access credentials on your machine. When you run anna-app dev in the future, you can directly use the platform capabilities associated with your current Anna account.
3.3 Confirm Login Status
You can use the following command to confirm your current login status:
anna-app whoami

If the current Anna Host, account information, and permission scopes are displayed correctly, the CLI login is complete.
3.4 What You Can Do After Logging In
Once logged in, you can directly use the real LLM and other platform capabilities provided by your Anna account during local debugging. This allows you to see how the App performs when connected to a real large language model without having to simulate model inputs and outputs yourself.
Note: Local development and debugging do not require additional publishing identity configurations. If, when publishing the App later, the CLI prompts that a Developer Handle has not been set or that the current account lacks App publishing permissions, please follow the Anna Developer Quickstart to complete the corresponding Developer Handle / Verified Developer configuration before continuing with the publication.
After completing this section, both your local development environment and the Anna CLI are ready. In the next section, we will formally create the project and get your first Anna App running locally.
4.Create and Run Your First Anna App
Your development environment is ready. Next, we will create a real Anna App project and get it running locally.
In this chapter, there is no rush to implement the full functionality. Our goal is to first obtain a runnable and verifiable baseline project, and then use Git to save this starting point. Afterward, we will let AI gradually complete the development on top of this baseline.
4.1 Create and Run the Project
In your terminal, navigate to the directory where you usually store your code, then run:
anna-app init my-first-anna-app --slug my-first-anna-app
anna-app inituses the Anna CLI’s built-in Starter Template to create themy-first-anna-appproject directory and automatically generates a minimal runnable Anna App, including a frontend page, Manifest, App configuration, and a default Python Executa.Therefore, instead of writing code from an empty project, we will be modifying this already functional scaffold step-by-step.
Enter the newly created project directory:
cd my-first-anna-app
Then start the local development environment:
anna-app dev

The terminal will output a local address: http://localhost:5180/. Open this address in your browser, and you will see a window titled my-first-anna-app containing a Run button. This page is the local debugging environment (harness) provided by the Anna CLI, where you can run and test your App. Click Run. If the page returns a result containing pong, it means the project is running successfully, and the basic invocation chain between the App frontend, Anna Runtime, and the local Executa has been established.
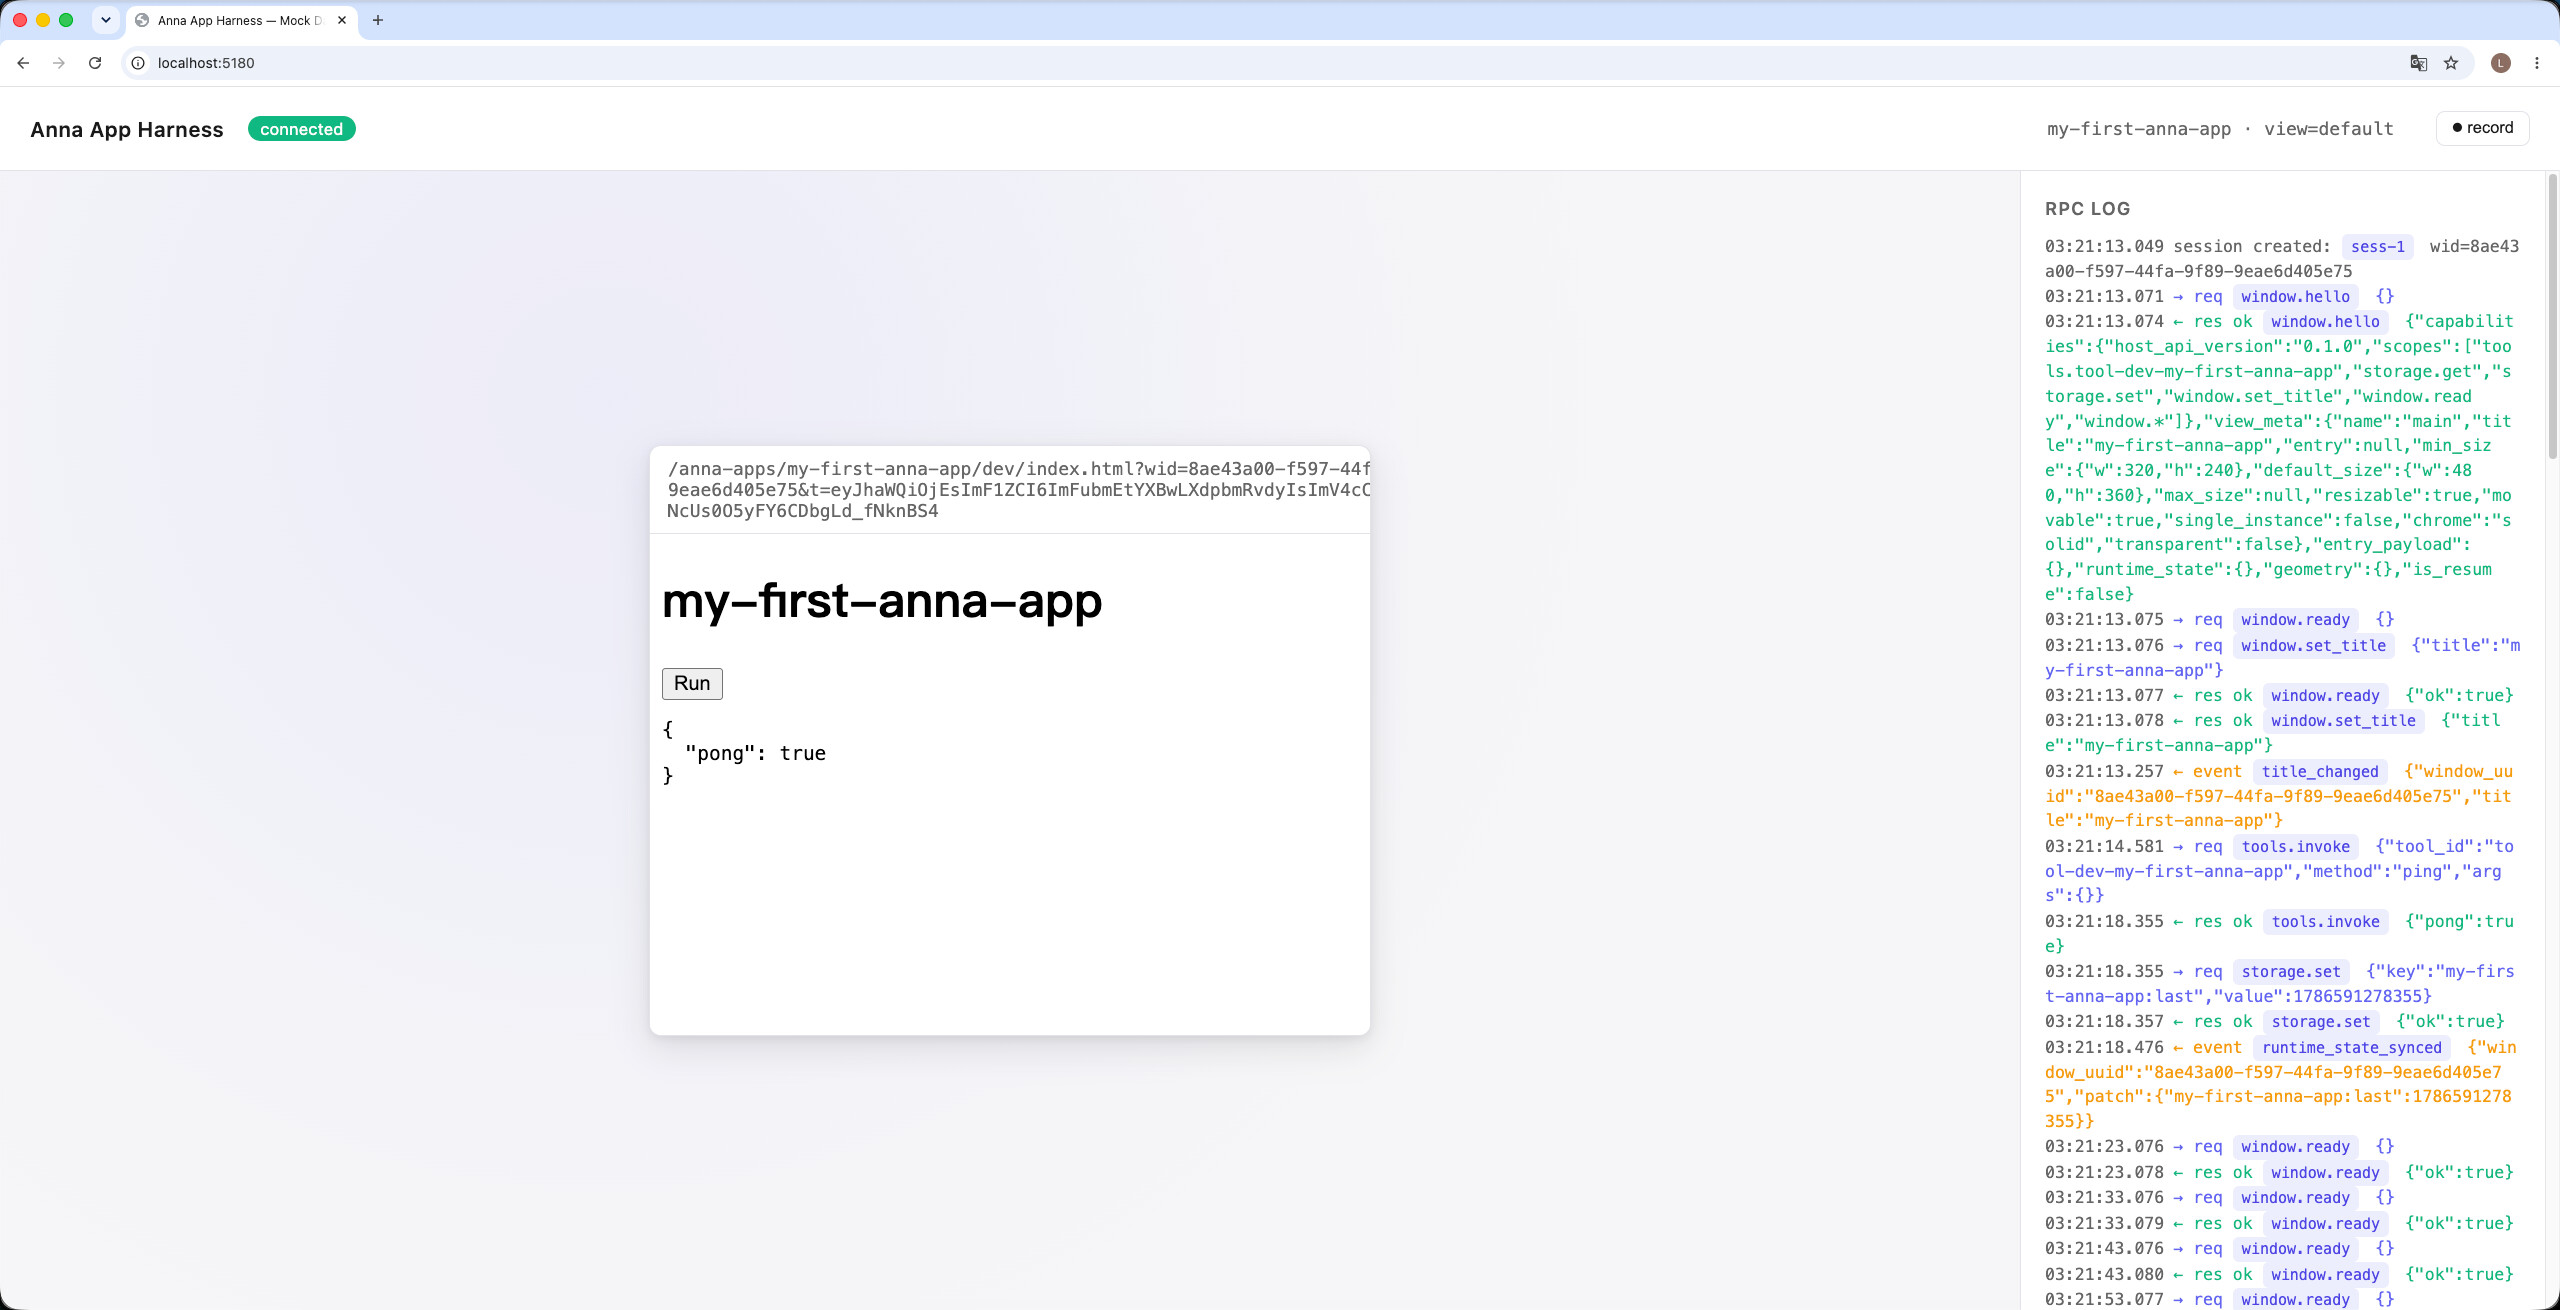
This might look like a simple button click, but a complete invocation chain has been executed behind the scenes:
App Page
↓ calls anna.tools.invoke
Anna Runtime
↓ starts and calls the local Executa
Python Executa
↓ executes the ping method
Anna Runtime
↓ returns the result
App Page
The App also saves the timestamp of this run via Anna Storage. In other words, the default project created by the Starter Template already demonstrates the three important components of an Anna App:
- App UI: The application interface running within the Anna window.
- Anna Runtime: Connects the App with Anna platform capabilities.
- Executa: The local tool that performs the actual tasks.
You don’t need to understand every detail yet. Just confirm that the project runs normally; we will gradually understand these parts as we modify the code later.
4.2 Validate the Project
Before you start modifying the code, confirm that the current project structure and configuration are valid.
Run the following in the project directory:
anna-app validate
If you see:
✓ validate passed

It means the current project structure and Manifest configuration have passed validation.
At this point, we have completed two fundamental verifications:
anna-app dev
  ↓
Click Run
  ↓
Returns pong

anna-app validate
  ↓
validate passed
This means the current project serves as a reliable starting point for further development.
In the future, every time you modify manifest.json, Host API configurations, or the project structure, it is recommended to re-run:
anna-app validate
This helps you identify configuration issues early, rather than troubleshooting them during publication.
4.3 Understanding the Project Structure
Now that the project has run successfully and passed validation, let’s look at the files that were just created. The project directory looks roughly like this:
my-first-anna-app/
├── app.json
├── manifest.json
├── README.md
├── bundle/
│   ├── index.html
│   └── app.js
└── executas/
    └── my-first-anna-app/
        ├── pyproject.toml
        └── my_first_anna_app_plugin.py
The responsibilities of each part are as follows:
| File or Directory | Role |
|---|---|
| app.json | Display information like App name, intro, and category |
| manifest.json | Declares App windows, permissions, Host APIs, and Executas |
| bundle/ | Frontend pages seen by the user in the Anna window |
| bundle/app.js | Connects to Anna Runtime and calls platform capabilities |
| executas/ | Local tools bundled with the App |
| my_first_anna_app_plugin.py | Default Python Executa, providing the ping method |
| README.md | Basic running instructions for the project |
Additionally, after running anna-app dev for the first time, an .anna/ directory will appear. This directory stores the local development registration information for the current App and usually does not require manual modification.
4.4 Understanding What the Default App Does
Now, let’s go back to the Run button you just clicked.
The default page looks very simple, but after clicking it, bundle/app.js actually performs three actions:
- Connects to the Anna host via
AnnaAppRuntime.connect(). - Calls the
pingmethod of the Python Executa viaanna.tools.invoke(). - Saves the current run time via
anna.storage.set().
The corresponding Python Executa is located at:
executas/my-first-anna-app/my_first_anna_app_plugin.py
After receiving the ping request, it returns:
{
  "success": true,
  "data": {
    "pong": true
  }
}
So the pong you saw on the page was not a hardcoded result in the frontend; rather, the App called the local Python Executa through the Anna Runtime, and the Executa returned it to the frontend.
This small piece of functionality is not complex, but its real purpose is to confirm:
- The App UI can run normally.
- The Anna Runtime can connect normally.
- The frontend can call the Executa.
- The Executa can execute and return results normally.
- The Manifest and related permission configurations work correctly.
This is why we ensure the default project runs successfully before modifying the code: by confirming the basic invocation chain is functional, subsequent development and troubleshooting become much easier.
4.5 Use Git to Save the Starting Point
We now have a baseline project that:
- Can run.
- Can pass validation.
- Has a functional frontend-to-Executa invocation chain.
Before letting AI start modifying the code, it is recommended to save this state using Git.
Since the current Starter Template does not automatically initialize Git, you can run:
git init
git add .
git commit -m "chore: scaffold first Anna App"
This way, whether you or the AI modifies the project later, you can see exactly what changed by running:
git diff
If future modifications cause issues, you can compare them with this verified initial version at any time without having to recreate the entire project.
4.6 What’s Next?
We have now completed the initialization of the first Anna App and confirmed it can:
Create project
  ↓
Run locally
  ↓
Call Executa
  ↓
Returns pong
  ↓
Pass validate
  ↓
Save baseline with Git
Next, we won’t be writing the entire application from scratch by hand. In the next chapter, we will first have the AI read the official Anna documentation, official examples, and the current project to understand how to develop an Anna App. Then, we will gradually transform this default ping example into a truly usable AI Text Summary App.
5.Transform the Default Project into a Text Summary App with AI Assistance
In the previous chapter, we created and ran the default project generated by the Anna CLI and confirmed that the basic invocation chain between the App UI, Anna Runtime, and Executa works correctly.
In this chapter, we will use AI to transform this default project into a complete AI Text Summary App.
It will simultaneously include:
- Anna App frontend pages;
- Python Executa backend tools;
- Anna Runtime communication;
- Anna LLM invocation;
- Parameter passing and result returning between frontend and backend;
- Local validation and real-world execution testing.
Upon completing this chapter, what we obtain is not just a Demo that displays a page, but a complete Anna App that truly incorporates the App UI, Executa, and Anna platform capabilities.
5.1 Defining What We Want to Develop
We are developing a simple AI Text Summary App.
Users can input a piece of text on the page and then click the “Generate Summary” button. The App will send the input to the Python Executa, which will call the LLM capabilities provided by Anna to generate a summary, and finally return the result to the page for display.
This App needs to implement the following functions:
- Provide a multi-line text input box;
- Provide a “Generate Summary” button;
- Give a prompt when the input is empty and refrain from sending a request;
- Display a loading state after clicking the button;
- Send user input to the Python Executa;
- Have the Executa request the real LLM provided by Anna;
- Display the summary result upon success;
- Display easy-to-understand error messages upon failure;
- Prevent users from clicking the button repeatedly during the request process.
The Anna platform already provides LLM capabilities, so this App does not need to connect directly to a model provider, nor does it need to save model API Keys itself.
In an Anna App, the frontend can call the LLM via Host APIs; the Executa can also use the model capabilities provided by Anna through reverse Sampling. This tutorial will adopt the second method, allowing the Python Executa to participate in the entire invocation process.
5.2 Why Involve Executa in LLM Calls?
For this text summary App, a simpler way to implement it would actually be to let the frontend call Anna’s Host API directly:
App → anna.llm.complete → Anna LLM
If the goal is only to complete a text summary, this method is sufficient. However, the goal of this tutorial is not just to implement a summary function, but to let you fully experience the development and publishing process of UI + Executa + Anna platform capabilities within an Anna App.
Therefore, we will have the frontend send the request to the Python Executa first, and then the Executa will call the Anna LLM via reverse Sampling:
App UI
  ↓
Anna Runtime
  ↓
Python Executa
  ↓
Reverse Sampling
  ↓
Anna LLM
In this way, we can simultaneously experience within a simple enough project:
- How to develop an Anna App frontend;
- How to write a Python Executa;
- How to let an App call its own Executa;
- How to let an Executa use platform capabilities provided by Anna;
- How to configure relevant permissions;
- How to debug the complete invocation chain locally;
- How to package the Executa into a binary;
- How to finally publish the App to the Anna platform.
5.3 Letting AI Read the Correct Materials First
Before letting the AI modify the code, let it understand Anna’s development style and the current project.
If you simply tell the AI:
“Help me develop an Anna App.”
It might implement it as a standard Web App or use outdated or non-existent Anna APIs.
Therefore, we will not let the AI write code immediately. Instead, we will first have it read:
- Current official Anna documentation;
- Official Anna examples;
- Code in the current project.
If there are conflicts between different materials, it is recommended to judge according to the following priority:
Current official Anna documentation
  ↓
Official Anna examples
  ↓
Code in the current project
  ↓
AI's general knowledge
In other words, we want the AI to read the current official materials first and then formulate a plan based on the current project, rather than relying on its existing general knowledge to start development directly. Open the my-first-anna-app project directory using an AI programming tool (such as Codex) and send the following prompt:
I am learning to develop my first Anna App.
My requirement is:

I want to develop an AI text summary App. The frontend is responsible for input and display, while the Python Executa handles summary requests and calls Anna's LLM via reverse Sampling. This project needs to fully demonstrate frontend-backend interaction and allow for future Executa packaging and App publishing.

Before modifying the code, please understand the current project and the development methods of the Anna platform.

Please complete the following investigation:
1. Read the official Anna documentation entry:
https://anna.partners/llms.txt
Based on my requirements, find and read relevant content from the official documentation. Possible topics include:
Anna App Quickstart
App UI SDK
App UI Host API
App Manifest
Local Development
Choosing between Host API and Executa
Executa Protocol
Executa Lifecycle
Executa Sampling
Executa Storage
Executa Binary Distribution
Publishing an App
2. Read the following content in the current project:
app.json
manifest.json
README.md
bundle/
executas/
Configurations related to local development in .anna/, but do not modify the files therein.
3. Read parts of the official example repository related to my requirements:
https://github.com/whtcjdtc2007/anna-executa-examples
Please select the most relevant examples and files to read based on my requirements, such as:
Anna App examples;
Frontend invocation methods in bundle/;
Permission declarations in manifest.json;
Python, Node.js, or Go Executa examples;
Reverse Sampling examples;
Storage examples;
Binary packaging and publishing examples.
4. Do not modify or delete any files for now.
Please only output the following:
A brief analysis of the current project;
The recommended architecture for my requirements;
A list of files to be modified or added;
Permissions and Executa plan;
Local running and validation plan;
Possible risks, assumptions, and issues to be confirmed;
A short, step-by-step implementation plan.

If there are ambiguities in the requirements, please provide a plan based on reasonable assumptions and list the questions for me to confirm at the end.
After sending this, do not let the AI start modifying the code yet. It should read the official materials, official examples, and the current project first, and then provide an implementation plan.
Focus on confirming whether it:
- Correctly understands the division of labor between the App UI and Executa;
- Uses current official Anna APIs;
- Correctly considers the Manifest and relevant permissions;
- Plans to call the Anna LLM via reverse Sampling;
- Does not introduce unnecessary third-party model APIs or extra infrastructure on its own.
Once you confirm there are no obvious problems with the overall plan, move to the next step and let the AI start implementation.
5.4 Letting AI Complete Development According to the Plan
The AI has read the official Anna materials, official examples, and the current project, and has provided an implementation plan. Once you confirm the plan meets your requirements, you can authorize it to start modifying the project. You don’t need to re-describe all the previous technical details because the AI already has the context from the previous stage. Continue by sending:
The plan looks good; please start implementation according to the plan you just proposed.
Please directly modify the necessary files in the current project to complete the development of the entire App. During development, you may run required installation, validation, and testing commands.
Please ensure:
1. The requirements I proposed are fully implemented;
2. Continue to follow official Anna documentation and official examples as the standard;
3. Frontend calls, Manifest permissions, tool IDs, and Executa configurations remain consistent;
4. Run the validation and tests supported by the project upon completion;
5. If errors are encountered, please analyze the cause and continue fixing them until the functionality runs normally.
Upon completion, please tell me:
Which files were modified or added;
Which functions were implemented;
Which validations and tests were run;
Which tests passed;
How I should perform manual acceptance locally.
From here, the AI officially enters the code modification stage.
In the future, when developing other Anna Apps, you can reuse this methodology:
AI reads official Anna materials and current project
  ↓
AI formulates implementation plan
  ↓
Human confirms the plan
  ↓
AI modifies code
  ↓
Validation and testing
  ↓
Human acceptance
The core principle is simple:
Let the AI understand Anna first, then let the AI write the Anna App.
5.5 Local Testing and Acceptance
After the AI completes development, do not rush into the publishing process.
Restart the local development environment:
anna-app dev

The CLI will output a local debugging address, for example:
http://localhost:5180/
This is the local debugging address after anna-app dev starts. Open this address in your browser and test each item according to the requirements defined in 5.1 to confirm if the APP meets your needs:

At a minimum, confirm:
- The page opens normally;
- The multi-line text input box allows content input;
- No request is sent when the input is empty, and a corresponding prompt is shown;
- A loading state is displayed after clicking “Generate Summary”;
- Duplicate submissions are prevented during the request process;
- User input is correctly sent to the Python Executa;
- The Executa can call the Anna LLM via reverse Sampling;
- The summary returned by the LLM is correctly displayed on the page;
- Easy-to-understand error messages are displayed when a request fails.
Don’t just confirm “the page can open”; you must truly run the complete invocation chain:
Input text
  ↓
Click Generate Summary
  ↓
App UI
  ↓
Anna Runtime
  ↓
Python Executa
  ↓
Reverse Sampling
  ↓
Anna LLM
  ↓
Summary returned
  ↓
Page displays result
Tip: Reverse Sampling requires correct Executa configuration and corresponding user authorization. If
SAMPLING_NOT_GRANTEDorSAMPLING_NOT_NEGOTIATEDappears during testing, you can give the full error message to the AI and let it check the project configuration according to the official Executa Sampling documentation; simultaneously, confirm that the current account has granted the required Sampling permissions.
Once functional acceptance is complete, run:
anna-app validate
If you see
✓ validate passed
It means the modified project still successfully passes Anna’s project validation.
5.6 Troubleshooting with AI When Errors Occur
It is normal for errors to occur during development. When you encounter a problem, do not just tell the AI “it failed to run” or “the page won’t open,” as these descriptions are insufficient for pinpointing the issue.
It is best to provide the AI with four types of information:
- What command you ran;
- What operation you performed;
- What result actually appeared;
- What you originally expected to see.
For example:
I ran anna-app dev in the current project.
The App page opens normally, but after entering text and clicking "Generate Summary," the request fails.

The error displayed on the page is:
```
<Paste full error from page>
```

The terminal output is:
```
<Paste relevant terminal logs>
```

I expected to see the Executa call Anna LLM via reverse Sampling and display the summary on the page.

Please reproduce and diagnose the problem first; do not guess modifications based solely on the error message.

Once the root cause is found, please fix it directly and re-run the relevant validation and tests. Finally, tell me the cause of the error, the modifications made, and the verification results.
5.7 Saving Development Results
After confirming that the tests passed, you can save these modifications:
git add .
git commit -m "feat: build Anna text summarizer"
We have now completed the full development process for this stage:
Clarify requirements
  ↓
AI reads official Anna materials and current project
  ↓
AI formulates implementation plan
  ↓
Confirm plan
  ↓
AI completes development
  ↓
Local testing and human acceptance
  ↓
Anna project validation
  ↓
Git saves results
Now, we have transformed the default ping example in the Starter Template into a complete AI Text Summary App containing App UI, Python Executa, and reverse Sampling. Next, we will enter the pre-publishing preparation, checking Executa and tool_id configurations to get ready for subsequent binary packaging and production release.
6.Pre-publishing Check: Confirm Bundled Executa Configuration
In the previous chapter, we completed the development and local verification of the Text Summary App.
Before proceeding to binary packaging and production release, you need to confirm whether the project is using the Bundled Executa configuration method currently recommended by Anna.
The core idea of Bundled Executa is: the developer declares the Executa bundled with the App in app.json, and references it via a stable bundled handle in manifest.json and the frontend code, rather than hardcoding and manually syncing specific tool_ids across multiple files.
For example, we can use summarizer as the bundled handle for this Executa:
app.json declares bundled Executa
        ↓
bundled handle: summarizer
        ↓
manifest.json / App frontend uses the same handle
        ↓
Anna CLI resolves the actual Executa during development and publishing
This way, whether in local development or subsequent production release, the project maintains a unified way of referencing the Executa without requiring the developer to manually maintain the platform-assigned tool_id.
Therefore, before starting the packaging, we will have the AI check if the current project is correctly using Bundled Executa and confirm that the references between app.json, manifest.json, frontend code, and Executa configuration remain consistent.
6.1 Letting AI Check and Organize Executa and tool_id Configurations
Continue using the AI programming tool from the previous chapter and keep the my-first-anna-app project open. Send the following prompt to the AI:
Please help me perform a pre-publishing check of the Executa and tool_id configurations for my Anna App.

For this step, do not package, upload, publish, or delete files, and do not modify the files in .anna/.

First, read the official Anna documentation entry:

https://anna.partners/llms.txt

Focus on:

- App Manifest
- Bundling Executas
- App UI Bundle Pipeline
- Publishing an App
- anna-app CLI reference

Then read the official examples:

https://github.com/whtcjdtc2007/anna-executa-examples/tree/main/examples/anna-app-llm-demo

Refer specifically to:

- app.json
- manifest.json
- bundle/index.html
- bundle/app.js
- bundle/anna-tool-ids.js
- executas/.../executa.json

Then check the following in the current project:

- app.json
- manifest.json
- bundle/index.html
- bundle/app.js
- bundle/anna-tool-ids.js(if it exists)
- executas/.../executa.json

Specifically confirm:


1. Whether app.json declares the local Executa via bundled_executas;
2. Whether the handle and path in bundled_executas are correct;
3. Whether manifest.json uses bundled:<handle> to reference the Executa instead of hardcoding a formal platform tool_id;
4. Whether ui.host_api.tools in manifest.json uses required:bundled:<handle>;
5. Whether bundle/index.html loads anna-tool-ids.js before app.js;
6. Whether bundle/app.js retrieves the platform-assigned tool_id via window.__ANNA_TOOL_IDS__ based on the handle;
7. Whether a reasonable dev fallback tool_id is retained for local development;
8. Whether there is any code from older versions that manually syncs platform-assigned tool_ids;
9. Whether the handles used in app.json, manifest.json, executa.json, and the frontend are consistent;
10. Whether the current configuration is suitable for automatic publishing of bundled Executas using anna-app apps publish.


Please strictly distinguish between:


The tool_id used for local development discovery in executa.json;
The platform-assigned tool_id generated after publishing on the Anna platform;
The bundled handle that should be used in app.json and manifest.json.


If you find that the configuration does not follow the current official recommended method, please directly modify the necessary files to fix it, but only modify:


Executa configurations;
Bundled handles;
Manifest;
Frontend tool_id retrieval methods.


Do not modify unrelated business logic. After the fix is complete:


1. Run anna-app validate --strict;
2. Run git diff to check the actual modifications;
3. Do not execute packaging, uploading, or publishing;
4. Tell me:
What the original issues were;
Which files were modified;
Where the tool_id is retrieved from during local development;
Where the tool_id is retrieved from during production release;
Whether anna-tool-ids.js is automatically generated by the platform;
Whether the current project is ready to enter the binary packaging stage.
After the AI completes the check, focus on confirming the last two items:
anna-app validate --strict
        ↓
Passed

Bundled Executa / tool_id configuration
        ↓
No platform-assigned tool_id needs to be manually synced
If there are no issues with these two items, it means the project is ready to proceed to the binary packaging stage.
Normally, once the AI finishes the modifications, the
tool_idin the project will already use this new Bundled Executa syntax. If you want to understand the details, continue with the following subsections in Chapter 6; otherwise(if you just want to complete the publishing process), skip directly to Chapter 7.
6.2 Checking app.json
app.json should declare which Executas the App contains and the local directory corresponding to each Executa.
For example:
{
  "bundled_executas": {
    "summarizer": {
      "path": "./executas/my-first-anna-app"
    }
  }
}
Here, summarizer is a stable bundled handle. It is not the final tool_id assigned by the platform, but the name used internally by the App to reference this Executa. The path points to the Executa directory in the current project. If app.json does not have bundled_executas, the Anna CLI will not be able to automatically find and publish this Executa when publishing the App.
6.3 Checking manifest.json
manifest.json should not directly write the tool_id used for local development:
{
  "tool_id": "tool-dev-my-first-anna-app"
}
Using a bundled handle is recommended:
{
  "required_executas": [
    {
      "tool_id": "bundled:summarizer",
      "version": "latest"
    }
  ]
}
At the same time, the UI’s permission to call the Executa should also reference the bundled handle:
{
  "host_api": {
    "tools": [
      "required:bundled:summarizer"
    ]
  }
}
Thus, the Manifest expresses:
“This App needs the
summarizerExecuta it carries and allows the window to call it.”
During publication, the Anna CLI will resolve bundled:summarizer into the actual Executa tool_id generated by the platform.
6.4 Checking How the Frontend Obtains the tool_id
The frontend should not hardcode the platform-assigned tool_id. The recommended way is to obtain the corresponding tool_id via the bundled handle.
In bundle/index.html, anna-tool-ids.js needs to be loaded before app.js:
<script src="anna-tool-ids.js" defer></script>
<script src="app.js" type="module"></script>
Then, in bundle/app.js, read the corresponding tool_id based on the bundled handle:
const EXECUTA_HANDLE = "summarizer";
const DEV_FALLBACK_TOOL_ID = "tool-dev-my-first-anna-app";

const TOOL_ID =
  window.__ANNA_TOOL_IDS__?.[EXECUTA_HANDLE] ||
  DEV_FALLBACK_TOOL_ID;
There are two important points here:
- When running
anna-app devlocally, the fallbacktool_idfrom the development environment can be used. - After production release, anna-tool-ids.js will provide the platform-assigned tool_id.
anna-tool-ids.js is an automatically generated mapping file and does not require manual editing. It will roughly contain:
window.__ANNA_TOOL_IDS__ = {
  summarizer: "Platform-generated tool_id"
};
The publishing process will generate or update this mapping based on the bundled handle. In this way, the frontend code always finds the corresponding Executa through the stable summarizer handle, without the developer having to manually maintain the tool_id in the formal environment.
6.5 Acceptance Criteria for This Section
After completing the Bundled Executa configuration check, the following consistent reference relationship should be maintained in the project:
app.json
  bundled_executas.summarizer
        ↓
manifest.json
  bundled:summarizer
        ↓
manifest.json
  required:bundled:summarizer
        ↓
bundle/app.js
  window.__ANNA_TOOL_IDS__["summarizer"]
        ↓
anna-tool-ids.js
  platform-assigned tool_id
This means the entire project always references this Executa around the same bundled handle—summarizer.
You also need to confirm:
app.jsonhas declared the local Executa viabundled_executas.- The bundled handles used in
app.json,manifest.json, and frontend code are consistent. - The local
tool_idinexecuta.jsonis still used for local development discovery. - production release does not require manual replacement or synchronization of the platform-assigned tool_id.
manifest.jsonshould not have the formal platformtool_idhardcoded.anna-tool-ids.jsdoes not require manual editing.app.jsonis the entry point for the Anna CLI to automatically handle bundled Executas.
Finally, run:
anna-app validate --strict
If the strict validation passes and there are no configurations in the project that require manual synchronization of platform-assigned tool_ids, the pre-publishing check for Bundled Executa is complete. We can then move on to the next chapter:
Packaging the Executa into a distributable binary.
7.Build Executa Multi-platform Binaries using GitHub Actions
Up to this point, our Python Executa has been running normally in the local environment. Next, we need to build it into independent binaries that can run on different operating systems and prepare the build artifacts required for Anna publication.
This chapter will complete the following workflow:
Python Executa
      ↓
GitHub Actions Multi-platform Build
      ↓
GitHub Release stores build artifacts
      ↓
Download to the project's dist/ directory
      ↓
Configure executa.json
      ↓
anna-app apps publish
      ↓
Anna uploads App and Executa binaries and creates a version
First, it is important to distinguish several roles:
- GitHub Actions: Builds Executa binaries on different operating systems.
- GitHub Release: Temporarily stores and hosts the completed binary files for download.
- Anna CLI: Reads the local project and build artifacts, then uploads them to Anna.
- Anna Platform: Stores App versions and Executas, and handles subsequent installation, review, and distribution.
GitHub primarily serves as a build and transit hub here, rather than being the final distribution platform for the Anna App. It is not recommended to commit completed binary files directly to the Git repository. Instead, have GitHub Actions perform the multi-platform build, save the artifacts to a GitHub Release, download them to a specified directory in the project, and finally have the Anna CLI upload them.
Crucial Note: The Anna Cloud Agent runs in a Linux environment. Therefore,
linux-x86_64is one of the most important build targets in this tutorial. If you want your App to function correctly in the Anna Cloud, you must ensure the Linux version of the Executa can be successfully built, installed, and executed. While macOS and Windows builds are for their respective local environments, the Linux build directly impacts the Cloud Agent scenario.
7.1 Why Build Multi-platform Binaries?
During local development, Anna can use the Python Executa directly from the project:
anna-app dev
  ↓
uv / Python
  ↓
my_first_anna_app_plugin.py
However, for production release, a user’s computer might not have Python, uv, or project dependencies installed. Therefore, it is best to build the Executa into independent binaries:
macOS Intel       → darwin-x86_64
macOS Apple Silicon → darwin-arm64
Linux x86_64      → linux-x86_64
Windows x86_64    → windows-x86_64
This allows Anna to install the corresponding version of the Executa based on the user’s operating system, removing the need for them to configure a Python environment.
The following requires special understanding:
- darwin-x86_64: For Intel-based Macs;
- darwin-arm64: For Apple Silicon Macs;
- windows-x86_64: For Windows;
- linux-x86_64: For Linux environments; this is also the version that must be prioritized to ensure the App runs correctly on the Anna Cloud Agent.
Therefore, although this tutorial will build for all four platforms simultaneously, we will pay special attention to whether the Linux binary functions correctly during subsequent testing.
7.2 Letting AI Write the GitHub Actions Workflow
Multi-platform builds involve different OS runners, build commands, compression formats, and artifact naming. We will continue to let the AI handle this based on Anna’s official documentation and the current GitHub environment. Send the following prompt to your AI programming tool:
I am now adding a multi-platform binary build process for the current Anna App's Python Executa.


Please read:


Official Anna documentation: https://anna.partners/llms.txt
Focus on: Executa Binary Distribution, Bundling Executas, Publishing an App, anna-app CLI reference.
Official examples: https://github.com/whtcjdtc2007/anna-executa-examples
Focus on: Python Executa build scripts, PyInstaller or other recommended methods, distribution.profiles.binary in executa.json, binary_artifacts configuration, and GitHub Actions examples.


Check the following in the project:


executas/my-first-anna-app/my_first_anna_app_plugin.py
executas/my-first-anna-app/pyproject.toml
executas/my-first-anna-app/executa.json
app.json, manifest.json, and existing .github/workflows/.


Goals:


1. Add a manually triggered GitHub Actions workflow.
2. Build independent binaries for the Python Executa.
3. Support at least: darwin-x86_64, darwin-arm64, linux-x86_64, and windows-x86_64.
4. Output .tar.gz for Unix platforms and .zip for Windows.
5. Ensure the entrypoint filename inside the archive matches the entrypoint in executa.json.
6. Include the Executa name, version, and platform in the artifact names.
7. Generate SHA-256 checksum files for each artifact.
8. Publish artifacts to GitHub Release assets for easy downloading.
9. Do NOT commit binaries to Git or modify files in .anna/.
10. Do NOT modify business logic unless necessary for binary support.


Please don't guess runner tags; choose available runners based on current GitHub documentation and explain the choice.


Upon completion, tell me:


New workflows or build scripts added;
Build commands and accurate filenames for each platform;
The entrypoint filename inside each archive
How to manually trigger the workflow;
Which local directory to place the downloaded Release artifacts;
How to fill the binary_artifacts.path in executa.json.
After the AI finishes, check if the workflow and artifact naming meet expectations. Specifically, verify:
linux-x86_64
      ↓
builds successfully
      ↓
generates the corresponding .tar.gz.
7.3 Running GitHub Actions
Push your project to GitHub. If you haven’t linked it yet, create a new repository and add it as a remote. Commit the new workflow and push.
Navigate to the Actions tab in your GitHub repository. (Example: https://github.com/wuyyyyyou/my-first-anna-app).

- Select the new workflow.

- Click Run workflow.

- Select the branch
- Wait for all four platforms to finish

- Confirm the
linux-x86_64build was successful.

- Open the corresponding GitHub Release.

- Download the four compression packages.

Under normal circumstances, the Release should contain at least:
darwin-x86_64
darwin-arm64
linux-x86_64
windows-x86_64
Do not just confirm that the “workflow shows overall success”; you must also independently verify that the Linux artifact has been correctly generated.
Once the build is complete, we have obtained the binary products required by Anna to execute the Executa in different operating environments.
7.4 Configuring executa.json
Modify:
executas/my-first-anna-app/executa.json
To expand the distribution configuration to include both local and binary profiles.
Example structure:
{
  "distribution": {
    "active": "binary",
    "profiles": {
      "local": {
        "type": "local",
        "supports_protocol": true
      },
      "binary": {
        "type": "binary",
        "supports_protocol": true,
        "binary_artifacts": {
          "darwin-arm64": {
            "path": "dist/my-first-anna-app-summarizer-{version}-darwin-arm64.tar.gz",
            "entrypoint": "my-first-anna-app-summarizer",
            "format": "tar.gz"
          },
          "darwin-x86_64": {
            "path": "dist/my-first-anna-app-summarizer-{version}-darwin-x86_64.tar.gz",
            "entrypoint": "my-first-anna-app-summarizer",
            "format": "tar.gz"
          },
          "linux-x86_64": {
            "path": "dist/my-first-anna-app-summarizer-{version}-linux-x86_64.tar.gz",
            "entrypoint": "my-first-anna-app-summarizer",
            "format": "tar.gz"
          },
          "windows-x86_64": {
            "path": "dist/my-first-anna-app-summarizer-{version}-windows-x86_64.zip",
            "entrypoint": "my-first-anna-app-summarizer.exe",
            "format": "zip"
          }
        }
      }
    }
  }
}
Notes:
- {version} will be replaced with the Executa version during publication;
- path must be identical to the actual filename downloaded locally;
- entrypoint must be identical to the executable filename inside the archive;
- Unix platforms use tar.gz;
- Windows uses zip;
- active: “binary” indicates that binary distribution will be used for the formal release.
- linux-x86_64 must not be omitted, otherwise the App may fail to obtain a runnable Executa within the Anna Cloud Agent.
7.5 Downloading Build Artifacts Locally
According to the binary_artifacts.path configuration, download the four compressed packages from the GitHub Release to the corresponding directories.
For example:
my-first-anna-app/
├── app.json
├── bundle
│   ├── anna-tool-ids.js
│   ├── app.js
│   ├── index.html
│   └── style.css
├── executas
│   └── my-first-anna-app
│       ├── dist
│       │   ├── my-first-anna-app-summarizer-0.2.0-darwin-arm64.tar.gz
│       │   ├── my-first-anna-app-summarizer-0.2.0-darwin-x86_64.tar.gz
│       │   ├── my-first-anna-app-summarizer-0.2.0-linux-x86_64.tar.gz
│       │   └── my-first-anna-app-summarizer-0.2.0-windows-x86_64.zip
│       ├── executa.json
│       ├── my_first_anna_app_plugin.py
│       ├── pyproject.toml
Note: The storage path of the compressed packages must be consistent with the
pathdefined inexecuta.json.
7.6 Upload App and Create Version
After confirming that the App, Bundled Executa configuration, and binary artifacts for all four platforms are ready, run:
anna-app apps publish
anna-app apps publish will handle the publication preparations for the App and Bundled Executa based on the current project configuration, including:
- Reading
app.json; - Reading
manifest.json; - Uploading the frontend bundle;
- Publishing or updating the Bundled Executa;
- Reading local binary compressed packages from
binary_artifacts; - Uploading binaries for the corresponding platforms;
- Handling the association between the bundled handle and the official Executa
tool_id; - Creating an immutable App version.
Therefore, this step does not require manual modification of:
- Official Executa
tool_id; - Production environment
tool_idinmanifest.json; - Platform mapping in
bundle/anna-tool-ids.js.
Anna CLI will complete these associations based on the previously configured Bundled Executa relationships.

During the publication process, ensure that the Linux binary is correctly identified and uploaded.
Note: After completing
anna-app apps publish, the App version has been uploaded and created, but this does not mean the version has passed review or is publicly available to other users in the Anna Marketplace.
Next, let’s install and test the version we just created.
7.7 Install and Test the Uploaded Version
Once the App version is successfully created, you can see the newly uploaded App on the Anna Developer page.
Before submitting for public review, it is recommended to install this version and test it again in the actual Anna environment.


Click “install” to download the app. Once the download is complete, you can view it in “Installed Apps”:

You can also start using it directly on the conversation page:


It is recommended to focus on two types of environments here:
- Local Environment
Confirm:
- The App can start normally;
- The Executa can be installed correctly;
- The App can call the Executa normally;
- Reverse Sampling and Anna LLM calls are normal;
- The complete workflow of Text Input → Summary Generation → Result Return can be completed.
- Anna Cloud Agent
The Cloud Agent runs in a Linux environment, so this is a critical verification before publication.
“Running on Mac” does not mean the App already meets the requirements for running on Anna Cloud.
For Apps that need to support the Cloud Agent, at least the following chain should be truly completed once:
Anna Cloud Agent(Linux)
        ↓
Install linux-x86_64 Executa
        ↓
Start Executa
        ↓
App calls Executa
        ↓
Reverse Sampling
        ↓
Anna LLM
        ↓
Summary returned
After confirming that both the local environment and the Cloud Agent environment work correctly, proceed to the final step: Submit for review and publicly release the App.
8.Submit for Review and Publish Your App
By this point, we have completed:
Create Project
  ↓
Local Development and Testing
  ↓
Bundled Executa Configuration
  ↓
Multi-platform Binary Build
  ↓
Key Confirmation of linux-x86_64
  ↓
Upload App and Executa
  ↓
Create App Version
  ↓
Install and Test
  ↓
Verify Anna Cloud Agent (Linux)
Currently, this App version exists on the Anna platform, but it is not yet public to other users in the Marketplace.
If you want other users to discover and install this App, you still need to complete the review and public release process.
8.1 Submit for Review
You need to enter the Anna Developer page, find the current App, and submit a review application.

8.2 Release Version After Passing Review
After the review is passed, return to the Anna Developer page and release the version that has passed the review.

After a successful release, other users will be able to discover and install the App in the Anna Marketplace.
Note: According to the current release process, every new version prepared for public release must go through review. A new version will only become visible to other users in the Marketplace after it has passed review and been released.
8.3 How to Update the App in the Future
When you continue to iterate on this App in the future, you can repeat the same process:
Modify App
  ↓
Local Run and Test
  ↓
anna-app validate
  ↓
If Executa changes, rebuild multi-platform binaries
  ↓
Key verification of linux-x86_64
  ↓
anna-app apps publish
  ↓
Install and test new version
  ↓
If Cloud Agent is supported, verify again in Linux environment
  ↓
Submit for review
  ↓
Review passed
  ↓
Publicly release new version
If only the App frontend is modified and the Executa itself has not changed, it is not necessarily required to rebuild the Executa; however, as long as the Executa’s code, dependencies, or execution method changes, you should re-confirm the corresponding binaries, especially the Linux build.
By now, you have completed the entire Anna App development process from 0 to launch:
Create your first Anna App
  ↓
Understand App UI / Runtime / Executa
  ↓
Complete functional development with AI assistance
  ↓
Local verification
  ↓
Organize Bundled Executa configuration
  ↓
Build multi-platform Executa binaries
  ↓
Verify Linux / Cloud Agent environment
  ↓
Upload and create App version
  ↓
Install and test
  ↓
Submit for review
  ↓
Official release
At this point, you have completed your first Anna App.
From a Starter Template with only Run and ping, to an AI App that can truly run, be installed, and be released for users, you have walked through the complete process of Anna App from development to launch.
The first App is now running; next, go and build what you truly want to make! 